
Table Saw Fence Accuracy: Deflection, Alignment, and When to Upgrade
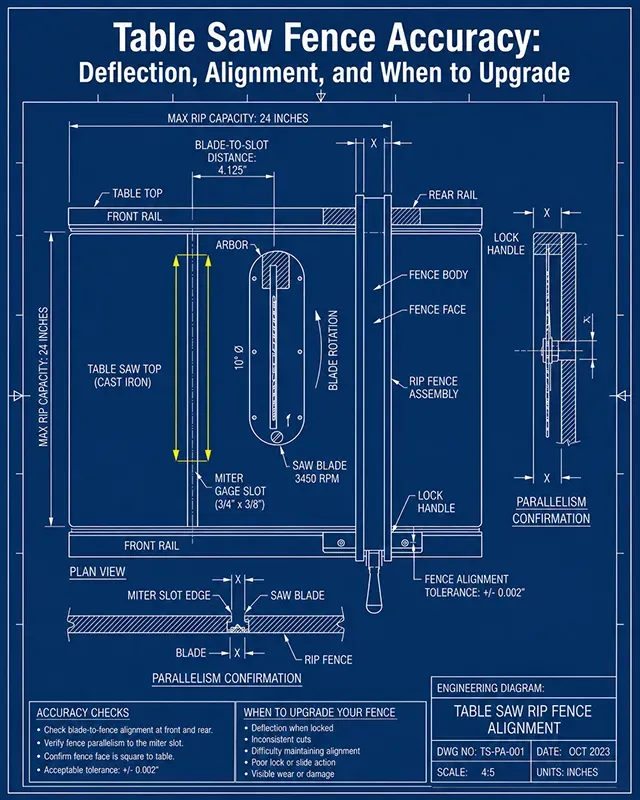
INFO
Evidence Level: Theory Lab + Measurement Protocol
This article explains rip fence accuracy using mechanical principles and setup procedures. It does not claim physical test results for any specific fence model.
DANGER
Safety Disclaimer: Do not use fence adjustment as a substitute for a riving knife, blade guard, push stick, and proper feed technique. OSHA safety guidelines emphasize that controlling kickback risk when ripping requires functional splitters or riving knives, sharp and appropriate blades, standing to the side of the cut line, and guiding stock smoothly parallel to the rip fence.
For rip cuts, the fence is the primary guidance system on a table saw. While buyers spend hours comparing motor horsepower or table surface materials, the table saw rip fence dictates the dimensional consistency, repeatability, and fundamental predictability of every parallel cut.
A fence is not a static straightedge. It operates as a mechanical beam under active load. When you feed a workpiece through the saw, the wood exerts continuous lateral force against the fence face. If the fence body shifts, yields, or sits out of alignment with the blade, cut quality drops immediately, and the risk of a dangerous kickback event climbs sharply. Knowing how to maximize table saw fence accuracy is vital for both clean joinery and basic workshop safety.
Why the Fence Matters for Rip Accuracy
When executing a rip cut, a rip fence for table saw usage establishes the reference plane for the entire operation. The material relies on this single flat plane to guide it cleanly past the spinning teeth of the blade.
If the reference plane shifts mid-cut, the relationship between the wood, the table, and the blade teeth breaks down. Minor inaccuracies lead to tedious sanding or ruined stock. Major inaccuracies cause the material to bind against the blade, creating a mechanical jam that can launch a workpiece back toward the operator. Understanding the mechanical failure modes of this reference plane is the first step toward achieving clean cuts.
The Three Failure Modes
A table saw rip fence typically fails to deliver accurate results due to one of three distinct mechanical errors.
1. Parallelism Error
This occurs when the fence sits at a fixed angle relative to the blade and miter slots while clamped at rest. If the rear of the fence angles inward toward the blade, it creates a convergence zone where wood is squeezed against the rising teeth at the back of the blade. If it angles away, the wood loses firm contact with the reference surface, resulting in inconsistent widths.
2. Deflection Under Feed Pressure
A fence might look perfectly parallel when you clamp it down. However, as you push a heavy board forward, your hand pressure pushes the wood sideways against the fence to keep it flat. If table saw fence deflection occurs under this lateral force, the cut width changes as the board moves through the saw.
3. Repeatability Error
This is the tendency of a fence to lock down at a slightly different angle every time you move it to a new measurement. If you must check both the front and back of the blade with a ruler every single time you change your cut width, your fence suffers from poor repeatability.
Alignment: Parallel vs. Slight Toe-Out
Among woodworkers and manufacturers, there is an ongoing debate regarding the exact geometry of table saw fence alignment.
The baseline setup standard is absolute parallelism. The fence face should be perfectly parallel to the miter slot, which in turn must be parallel to the blade. This setup ensures that the cut width remains identical from the front of the table to the back. It provides a highly predictable setup that is easy to verify.
However, some manufacturer setup guides suggest that a minute amount of “toe-out” at the rear of the fence is acceptable. This means the outfeed end of the fence angles away from the blade by roughly 0.002 to 0.005 inches. The reasoning is that a tiny fraction of clearance prevents the wood from binding against the rear teeth, reducing the chance of friction burns.
Conversely, other tool specialists and safety experts argue against intentional toe-out. They maintain that the fence must remain dead-parallel, and that wood binding should be managed exclusively by a properly aligned riving knife or splitter.
What everyone agrees on is that any “toe-in”—where the rear of the fence points toward the blade—is explicitly dangerous. Furthermore, a massive toe-out approaching 1/32 inch (0.030 inches) or more is a severe misalignment that will cause wood chatter, rough edges, and highly inaccurate dimensions. It should never be used to mask a poorly maintained saw.
Deflection: Why a Fence Moves Even When It Looks Locked
When a woodworker notices the back of a fence moving during a cut, the long fence body may look like the problem. In many cases, however, the movement begins at the locking head, wear pads, rail, or clamp geometry before the fence face itself becomes the limiting factor.
The mechanism relies on a leverage system. When you throw the locking lever at the front, a small cam or clamping plate compresses against the front rail. If the steel rail tube flexes, if the internal locking rods stretch, or if the low-friction nylon wear pads have worn thin, the locking head cannot bite hard enough. The long arm of the fence then acts as a giant lever, turning a tiny amount of play at the front rail into a massive shift at the far end of the table.
Dial Indicator Protocol
To accurately diagnose whether your fence is suffering from true mechanical play or a simple setup error, stop using tape measures. You need a dial indicator mounted to a bar that fits snugly into your table saw’s miter slot.
Before treating the fence as the problem, confirm that the blade itself is parallel to the miter slot. The fence is usually measured against the miter slot because the slot is the stable reference track, but the full system only works if blade, miter slot, and fence agree with one another.
Safety Preparation
- Disconnect the table saw from the power source completely by unplugging it.
- Lower the saw blade completely beneath the table surface.
- Remove all wood chips, fine sawdust, and pitch deposits from the miter slot, the front rail, and the reference face of the fence.
Measurement Steps
- Slide the fence over until it sits roughly 3 to 5 inches to the right of the miter slot. Lock the fence handle down firmly.
- Place the dial indicator fixture into the miter slot at the front of the table saw.
- Adjust the position of the indicator until the plunge tip makes contact with the front edge of the fence face. Compress the plunger slightly so it has room to move in both directions, then rotate the dial bezel to align the needle with zero.
- Slowly slide the indicator fixture down the miter slot toward the back of the table. Watch the needle move as you approach the outfeed end of the fence. Note the final reading.
- Slide the indicator back to the center point of the fence length. Keep the indicator tip touching the fence.
- Apply moderate hand pressure against the side of the fence, simulating the lateral force you use to hold a board flat during a rip cut. Note how far the needle moves under load, and check if it snaps back to zero when you release the pressure.
Interpreting the Reading
These dales and ranges can be used for both static parallelism checks and load-based deflection checks, but they describe different problems. Static error tells you whether the fence is aligned at rest. Deflection tells you whether the fence stays aligned when pressure is applied.
Without a controlled test fixture, deflection numbers should be treated as diagnostic ranges, not universal specifications. In practice, movement above roughly 0.010 inch under light-to-moderate side pressure is enough to justify adjustment, while movement approaching 0.015–0.030 inch indicates a fence system that is unlikely to deliver repeatable rip widths without repair or upgrade.
- 0.000 to 0.003 inches: Excellent alignment. The system is highly rigid and tuned properly for precise furniture work.
- 0.003 to 0.005 inches: Generally acceptable performance. This variance will rarely show up in real-world woodworking projects. Check your test cuts for burn marks.
- 0.005 to 0.010 inches: Out of ideal tolerance. You should adjust the fence parameters before executing precision joinery or ripping expensive hardwoods.
- 0.010 to 0.015 inches: Problematic behavior for a stationary shop saw. This level of play is common on lightweight portable jobsite saws but indicates a loose mechanism that requires mechanical inspection.
- 0.030 inches or more: Severe error zone. If this is static toe-out, it matches the 1/32-inch range that some manufacturer guidance treats as dangerous. If this is deflection under hand pressure, the fence is no longer acting as a stable reference surface. Operating a saw with this much play or alignment error is unsafe.
Fence Types Compared
The underlying architecture of your fence system determines how it handles clamping pressure and where wear patterns develop over time.
| Fence Design Type | Primary Locking Mechanism | Common Structural Vulnerability | What to Measure |
|---|---|---|---|
| Two-Point Clamping | Front lever pulls an internal rod to hook the rear rail. | Connecting rod stretches over time; rear hook slips easily. | Rear clamp engagement consistency; parallel drift when locking. |
| T-Square (Biesemeyer Style) | Cam lever applies three-point pressure exclusively to front rail. | Relies entirely on front rail stiffness; rear floats freely. | Front rail tube deflection; nylon guide screw wear. |
| Rack and Pinion | Dual geared tracks moved uniformly by a synchronized cross-shaft. | Gear teeth collect packed dust; backlash develops in gears. | Gear backlash play; parallel alignment between front and rear gears. |
Adjust, Repair, or Upgrade?
Do not run out and buy an expensive aftermarket table saw fence upgrade the moment your dial indicator shows an error. Many factory fences can be salvaged with basic maintenance.
Adjust the System If:
- The fence sits out of parallel but the variance is consistent every time you lock it. Most T-square fences feature two nylon set screws on the T-head that change the resting angle against the rail. Adjusting these will true the fence up to your miter slot.
- The fence drifts because the clamping lever feels loose. Tightening the primary cam nut or adjusting the rear hook tension rod can restore the necessary clamping force.
Repair the System If:
- The fence face shifts because the low-friction pads on the underside or sides of the locking head are worn down or missing. Replacing these small plastic pads eliminates sloppy movement.
- The tape measure cursor is inaccurate, or the front rail has loosened from the cast-iron table. Retightening the mounting bolts fixes basic drift.
Upgrade the System If:
- The aluminum or steel fence body itself is warped, twisted, or cupped across its vertical profile. No amount of rail adjustment can fix a distorted reference surface.
- The front rail tube is made of thin-gauge steel that visibly buckles or twists when you engage the locking handle, preventing a solid lock.
- You have tightened the internal cam adjustments to their maximum specification, yet the rear of the fence still deflects more than 0.015 inches under minor hand pressure due to fatigued components.
Frequently Asked Questions
Is a table saw fence supposed to be perfectly parallel? For most users, yes. Perfect parallelism to the miter slot and blade is the preferred baseline setup. While some manufacturer instruction manuals allow for a very minute rear toe-out of 0.002 to 0.005 inches to reduce the chance of wood binding, toe-in must always be avoided.
How do I know if my table saw fence is bad? A bad fence will not lock down parallel repeatedly, shifts out of place under light sideways pressure, or features a warped or cupped reference face. If you are forced to measure both the front and back ends of the fence with a tape measure after every single adjustment, the clamping system is failing.
Is a table saw fence upgrade worth it? An upgrade is worth it only if careful adjustment and repair cannot solve your accuracy issues. Investing in a heavy-duty aftermarket fence makes sense if your existing fence body is permanently warped, your mounting rail flexes under light loads, or the locking head cannot consistently hold its position.
Can fence misalignment cause kickback? Yes. If a fence toes inward at the rear, it pinches the workpiece directly against the back teeth of the spinning blade. This causes the wood to climb the teeth, significantly increasing the risk of a dangerous kickback event. Misalignment also routinely causes friction burning, binding, and poor edge quality.
A frustrating rip-cut experience is often not a motor problem. In many cases, the issue comes from the reference system guiding the wood: fence alignment, fence deflection, blade-to-slot alignment, or feed technique. Before blaming your equipment or investing in costly modifications, bring a systematic approach to your diagnostics. Measure first. Adjust second. Upgrade only when the underlying architecture cannot hold alignment under load.