Table Saw Taper Jig Explained: Safer Taper Cuts and Setup Logic
INFO
Evidence Level: Manufacturer manuals, safety documentation, owner feedback, and mechanical analysis.
A table saw is fundamentally designed to cut things square or parallel. The rip fence handles parallel long cuts, and the miter gauge handles perpendicular or standard angled crosscuts.
But when you need to build furniture with tapered legs or cut a long, wedge-shaped panel, the standard geometry of the saw stops working. Trying to ride an angled piece of wood directly against a straight fence can make the workpiece twist, drift, or bind, increasing the risk of kickback.
A table saw taper jig bridges this gap. It creates a straight reference line that lets you feed the workpiece past the blade in a more controlled path. However, not all taper jigs function the same way. The mechanical differences in how these jigs hold the wood—and where they send the offcut—have a major impact on both accuracy and workshop safety.
Why Taper Cuts Are Mechanically Different
Cutting tapers on a table saw presents a unique mechanical problem: the edge you want to ride against your reference surface (the fence or the jig) is not parallel to the line being cut by the blade.
Because the blade is removing material at an angle, the workpiece physically gets narrower as you push it forward. If you were to attempt this freehand or try to force the angled edge against the table saw fence, the board can drift away from the blade or pinch near the rear teeth, increasing the chance of kickback.
What a Taper Jig Actually Does
A taper jig solves this geometry problem by acting as a surrogate reference edge. It holds the workpiece at your desired angle, while the edge of the jig itself moves straight through the saw.
The jig absorbs the complex angle, turning the operation back into a standard, straight-line feed. But how the jig grips the wood dictates how much control you actually have over the cut.
Unclamped Hinged Jigs vs. Clamped Taper Sleds
Historically, tapering jigs were simple hinged arms. Many newer tapering systems add better workholding, guided bases, or repeatable indexing. The key distinction is not only whether the jig rides the fence or the miter slot. The key question is whether the workpiece is positively restrained.
The Traditional Hinged V-Jig (Unclamped)
The most recognizable taper jig is the classic aluminum or wooden “V-hinge.” You open the arms to your desired angle, lock the bracket, place the jig against your rip fence, and nestle the workpiece into the inside arm.
The Mechanical Tradeoffs:
- Friction-dependent feeding: The wood is not clamped to the jig. It often relies heavily on a small heel hook at the back of the jig and the friction from your push stick or push block to keep the wood from slipping backward.
- Divided attention: You have to push the jig forward, push the wood down, and maintain lateral pressure against the fence all at the same time. If your hand pressure slips, the wood can shift mid-cut.
While these jigs are inexpensive and quick to set up for rough work, some users move away from these jigs after experiencing slipped cuts or inconsistent results.
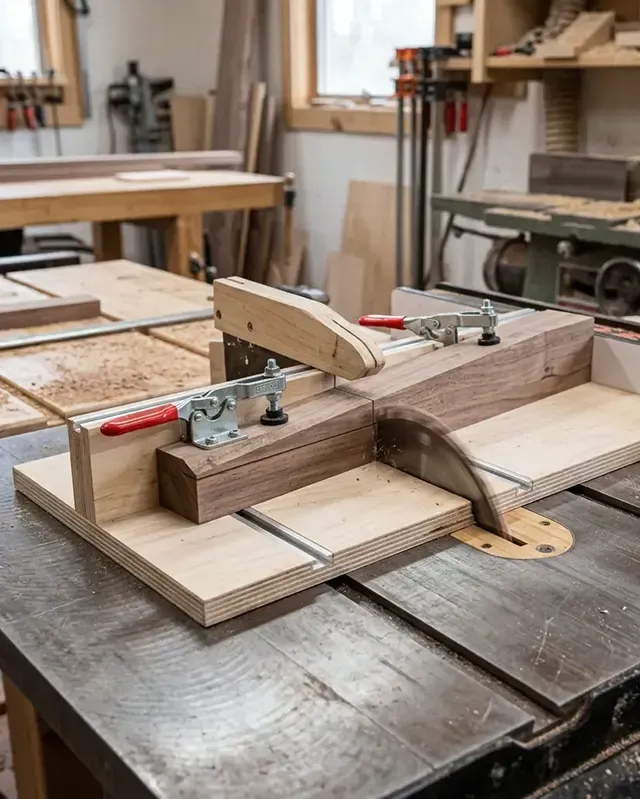
The Clamped Taper Sled (Positive Restraint)
A clamped taper sled functions similarly to a standard table saw sled. It features a flat base (usually MDF or plywood) with toggle clamps or hold-downs that physically lock the workpiece in place. Some clamped systems ride against the fence, while others use a runner that tracks in the miter slot.
The Mechanical Advantages:
- Positive workholding: Because the wood is securely clamped, your hands do not need to hold the workpiece directly near the blade. The cut becomes a simple, forward push.
- Better force control: The clamps reduce the need for your hands to resist the cutting forces directly.
- Fiber support: A sled base acts like a zero-clearance insert, which can help support the fibers near the cut line and reduce bottom-side tear-out.
When set up correctly, a properly built clamped table saw sled can be safer and more repeatable because it removes many of the variables created by human grip and uneven feed pressure.
The Offcut Trapping Risk
One of the most significant dangers in tapering is offcut trapping.
Poorly planned fence-riding setups can create a trapped-offcut situation if the waste side of the wood is confined between the spinning blade and the rip fence. Because the waste piece is often a thin, unsupported wedge, if it gets pinched, it can become a projectile.
Using a miter-slot riding sled allows you to move the rip fence out of the cut, which usually gives the offcut a clearer path away from the blade, reducing the risks associated with table saw kickback mechanics.
What a Taper Jig Is Not For
Even the best jig has limits. A taper jig should not be used for:
- Tiny parts: If the workpiece is too small to be securely grabbed by the clamps without the clamp hardware crossing the cut line, do not attempt that taper cut on the table saw with this setup.
- Unstable faces: The wood must sit perfectly flat on the sled or the table. Severely warped, twisted, or round stock will rock during the cut, which can bind the blade.
- Hardware interference: If you cannot complete a full dry run without the jig, clamps, handle, or workpiece contacting the blade, guard, or riving knife, do not make the cut.
Setup Logic for a Taper Cut
Regardless of which style you use, the setup logic prioritizes visual alignment and path clearance over numerical angles.
1. Mark the Stock
Draw the exact taper you want directly onto your workpiece. For a tapered leg, mark where the taper begins and where it ends at the foot, then connect the dots with a straight edge.
2. Align the Mark to the Jig
Place the workpiece in the jig. Do not obsess over measuring the angle of the jig with a protractor. Instead, visually align the drawn line with the jig’s cut reference edge or parallel to the saw blade, depending on the jig design.
3. Clamp and Check the Workpiece
If using a sled, engage the hold-down clamps. Ensure the wood cannot pivot or slide. Do not let a clamp sit directly over the waste line or near the blade path. If cutting multiple identical legs, set a stop block at the back or top of the sled so subsequent pieces drop into the exact same position.
4. Plan the Keeper Side and Offcut Side
Before turning on the saw, identify the waste. The waste piece must have a clear escape path. If the offcut will be trapped against the fence, you must reconfigure your setup.
5. Dry Run Before Power
With the saw unplugged or turned off, and the blade lowered if needed, push the jig through its entire range of motion. Check that:
- The clamps clear the blade and the riving knife.
- The handles clear the blade guard.
- The sled does not tip downward as it hangs off the back of the saw (ensure you have adequate outfeed support).
6. Execute the Cut
Turn on the saw and feed the jig forward at a steady pace. Continue pushing until the cut is complete and the workpiece has cleared the blade area. Follow the jig manufacturer’s instructions for guard and riving knife clearance, and let the blade come to a complete stop before pulling the jig back.
Practical Limits and Saw Setup
Adding table saw jigs to your workflow introduces new variables that require your saw to be properly tuned.
If you are using a miter-slot riding sled and experience burning on the wood or heavy resistance pushing the sled, the issue might not be the blade itself; it may be alignment, runner fit, or the sled path. Because the sled’s path is locked by the miter slot, the table saw blade alignment must be precise. If the blade is not parallel to the miter slot, the rigid path of the sled will force the wood to drag against the side of the blade. You can use a blade-to-miter-slot alignment calculator to help verify if your saw is tracking properly before adjusting your jig.
Additionally, check your miter bar fit. Too much slop allows the sled to pivot slightly in the slot, ruining the cut line. A bar that fits too tightly will require dangerous amounts of force to push. Finally, taper sleds consume cut capacity; a 1/2-inch thick sled base means you lose 1/2-inch of maximum blade height, which matters when tapering thick table legs.
Bottom Line
A taper jig does not make an angled cut safe automatically. However, when you use a jig that positively restrains the workpiece, plan an open escape path for the offcut, and ensure your saw is aligned, a taper jig successfully converts a highly unstable angled cut into a controlled, repeatable straight-feed operation, making it one of the most valuable table saw jigs for furniture building.